pfSense – Access your firewall from anywhere with your Dynamic DNS host
In my previous article, I have explained about configuring Dynamic DNS with pfSense. My next article ideally should be using VPN with the DynDNS configured as I promised. However, that requires a complete explanation along with a careful consideration to make sure I don’t miss anything. I’m half-way through the article and will post soon as I finish composing it. But for here and now, let me draft this post in between as a note to myself for later use. 🙂
Now that we have DynDNS set-up, wouldn’t it be great if we have access to the firewall using it as well? Given that, I’m not really a fan of allowing the web access of the firewall over the internet but this is all for learning purpose. And what I have done here is that, firewall can only be accessed by certain IP series. As in, my corporate office has about 3 – 4 static IPs divided into different network serving purpose and I have listed them in pfsense and called them on pfsense rules to make sure it only allows those IPs.
The steps shown below is when setting up access to given specific IPs. All you have to consider is allowing “any” instead of the alias that I have mentioned below on the WAN rules page. This should pretty much allow access from outside world being anywhere.
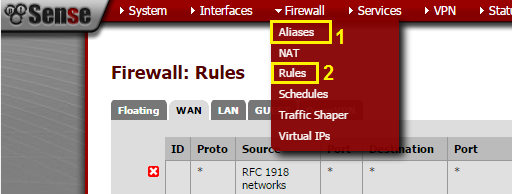
- As you see above, number one is for alias as I need to make a set of IP (since I have multiple static IPs) and called them into a single alias
- Rules, is basically what you need in-order to allow the firewall access from outside
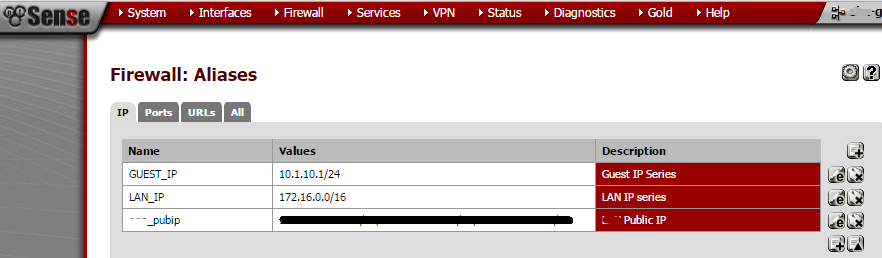
Above is a sneak-peak of some alias that I have created along with the public IPs as well. If you’re not planning to allow to any specific IPs, then you can ignore this. Also please make sure not to do this step if you have Dynamic IPs and if you’re confused, speak to your ISP and understand what sort of IPs allocated to your connection.
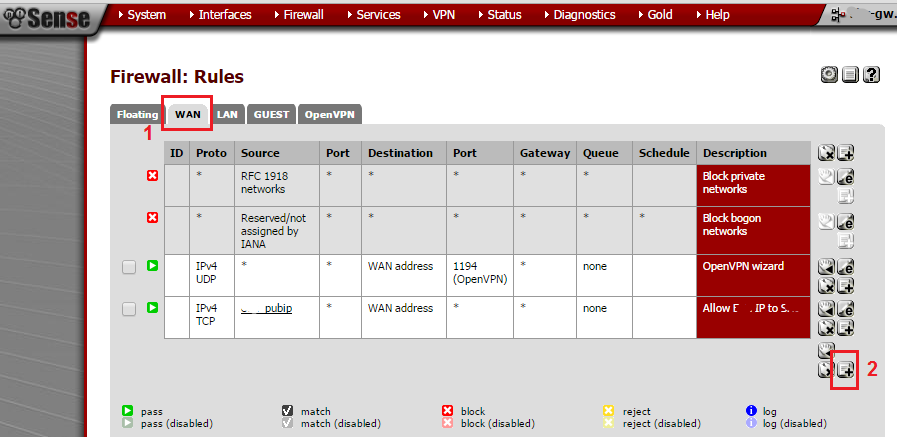
- As seen on the first picture numbered 2, above is the rules page. Navigate to WAN (usually it defaults to WAN tab)
- Select the “+”, and start creating the rule (above seen is where I have already created)
You also need to understand that pfsense has its basic guide for the rules and how it works/responds based on its sequence. Read Firewall Rules Basics guide documented in their official page for more understanding
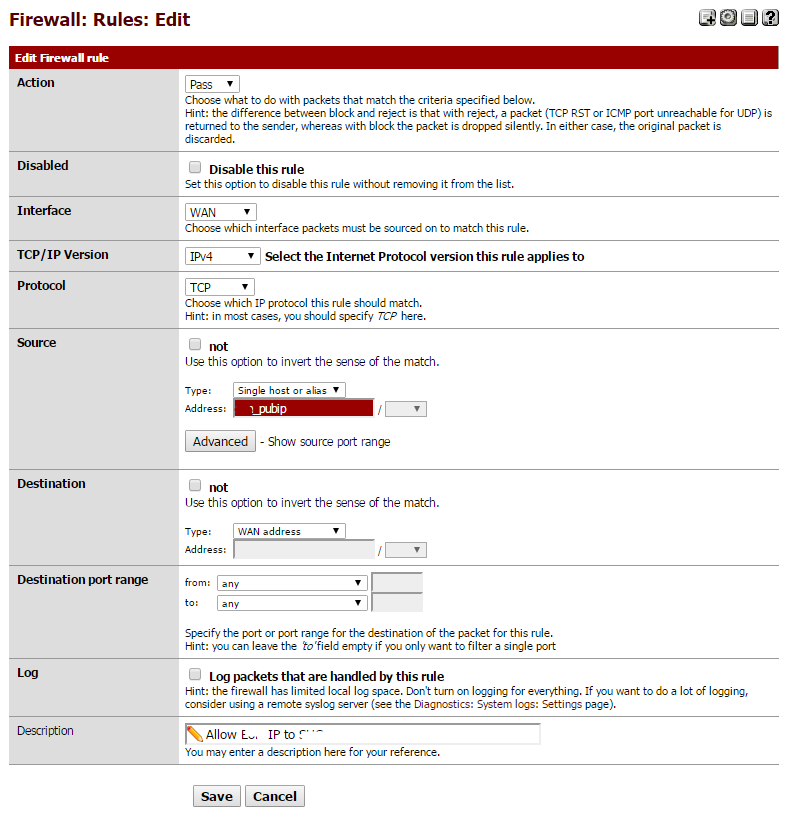
So as seen above, I have created a rule on WAN interface where the source is my public IPs called as an alias (for dynamic IP users, they can instead select “any” for access). Click on advance and select “any” on the source for port range. Moving forward, select “WAN address” for destination and “any” for destination port range. Well you could simply it with HTTP/HTTPS access as well but in my case, it will always match source before sending the request.
Well! once the options are in place, simply save the rule and you’re done! It should work like a charm. 😉
pfSense – Configure Dynamic DNS with NoIP
Viber end-to-end encryption with the latest build

An IT professional living far away from the pearl of Indian ocean. A Telecom nomad moved towards networking & hospitality IT building elegant resort in the romantic island of Maldives. An open-source fanatic, a geek and yes! a minion fan. I prefer football & popcorn ^_^